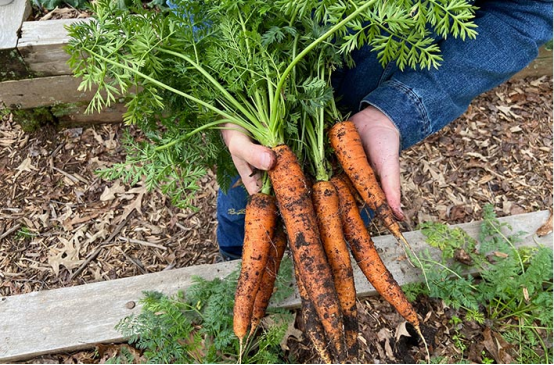
Growing carrots can be incredibly rewarding, offering a sweet, crisp harvest straight from your garden. However, it can also be a source of frustration when you pull up forked, stunted, or bitter roots. The secret to a perfect carrot crop lies not in complex techniques, but in mastering two fundamental principles: creating exceptionally loose soil and practicing diligent thinning. This guide will expand on these core concepts, providing a comprehensive roadmap from soil preparation to harvest, ensuring your efforts result in the straight, sweet carrots you’ve been dreaming of.
The Foundation: Why Perfect Soil is Non-Negotiable
Before you even think about planting a seed, you must understand the world from a carrot’s perspective. The carrot you eat is a taproot, a primary root designed to drive deep into the earth to anchor the plant and absorb water and nutrients. Any obstruction it encounters will cause it to deform, split, or stop growing altogether. This is why soil preparation is the most critical stage of growing carrots.
Understanding the Carrot Taproot’s Needs
A carrot taproot grows by pushing its tip downward. If it hits a rock, a clump of clay, or even compacted soil, its growth is impeded. The root will then try to grow around the obstacle, resulting in forking (splitting into multiple smaller roots) or stunting. To achieve long, straight carrots, you must provide a clear, unobstructed path for at least 10-12 inches deep.
The Science Behind “Forking” and Deformed Carrots
Forking is a direct response to soil obstruction. But other issues can arise from poor soil. “Hairy” roots, an excess of fine lateral roots, are often a sign of overly rich soil, particularly with fresh, un-composted manure. The high nitrogen content encourages leafy top growth and excessive side root development at the expense of the main taproot.

Step-by-Step Soil Preparation for a Bountiful Harvest
Creating the ideal carrot bed is a physical process that pays huge dividends. The goal is to achieve a fine, loose, and well-draining soil texture, often referred to as good “tilth.”
Initial Bed Clearing and Tilling
Start by thoroughly clearing the designated area of all weeds, rocks, and debris. Use a garden fork or tiller to loosen the soil to a depth of at least 12 inches. As you work, feel for and remove any remaining stones or hard clumps of clay. This initial deep tilling is essential for breaking up compaction.
Amending Your Soil for Optimal Texture
Few gardens have naturally perfect soil. Most will require amendments. If you have heavy clay soil, incorporate several inches of coarse sand and well-rotted compost to improve drainage and lighten the texture. For sandy soils, adding compost and peat moss will help retain necessary moisture and nutrients. Avoid using fresh manure, as it can cause forking and attract pests like the carrot rust fly.
Carrot Bed Preparation Checklist
- Clear the Area: Remove all weeds, rocks, sticks, and old plant debris from the planting site.
- Deep Tillage: Loosen the soil to a minimum depth of 12 inches using a garden fork, spade, or tiller.
- Remove Obstructions: Sift through the loosened soil by hand or with a rake to remove any missed stones or hard clods.
- Add Amendments: Work in 2-4 inches of mature compost to add gentle nutrients and improve soil structure.
- Add Sand (for clay soil): If your soil is heavy clay, incorporate coarse builder’s sand to improve drainage.
- Rake Smooth: Create a fine, level, and smooth seedbed, breaking up any remaining small clumps. The final texture should be light and fluffy.
Planting and Thinning: The Art of Spacing
With your soil perfectly prepared, the next critical phase is planting and thinning. Carrot seeds are tiny, making precise spacing difficult. This is why thinning is not an optional step—it is mandatory for growing carrots of any significant size.
Sowing Seeds for Success
Sow carrot seeds directly into the garden bed, as they do not transplant well. Plant them about 1/4 inch deep in rows spaced 12-18 inches apart. To make sowing easier, you can mix the tiny seeds with a small amount of sand before sprinkling them along the row. This helps distribute them more evenly. Lightly cover the seeds with soil and water gently.
The Critical Importance of Thinning
When seedlings are about 1-2 inches tall, it’s time for the first thinning. The goal is to create space for each remaining carrot to develop without competition for light, water, and nutrients. Overcrowded carrots will remain small, pale, and underdeveloped.
First Thinning: When seedlings are 1-2 inches tall, thin them to stand about 1 inch apart. Use small scissors to snip the tops of the unwanted seedlings at the soil line. Pulling them out can disturb the delicate roots of the carrots you want to keep.
Second Thinning: A few weeks later, when the tops are more established, perform a second thinning. This time, space the carrots to their final distance, typically 2-3 inches apart. These small thinned carrots are often edible and can be enjoyed as a first micro-harvest.
Expert Tips for Sweet and Crisp Carrots
Beyond soil and thinning, a few extra techniques can elevate your carrot crop from good to great.
Watering Strategy
Provide consistent moisture, aiming for about one inch of water per week. Deep, infrequent watering is better than shallow, daily sprinkling, as it encourages the taproot to grow deeper. Inconsistent watering can lead to cracking and splitting of the roots.
Nutrient Management
Carrots are not heavy feeders. Excess nitrogen promotes lush, green tops but small, hairy roots. Focus on fertilizers higher in potassium (K) and phosphate (P), which support strong root development. If you amended your soil with good compost at the start, you may not need any additional fertilizer.
Mulching
Once the carrot tops are a few inches tall, apply a light layer of mulch, such as straw or shredded leaves. Mulch helps retain soil moisture, suppress weeds, and keep the soil cool. It also prevents the “shoulders” of the carrots from being exposed to sunlight, which can cause them to turn green and bitter.
Frequently Asked Questions (FAQ)
- Why are my carrots forked and covered in tiny roots?
- Forking is almost always caused by an obstruction in the soil, such as a rock, hard clay, or compacted earth. The “hairy” or excessive side roots are typically a result of too much nitrogen in the soil, often from using fresh manure or a high-nitrogen fertilizer.
- How do I know when my carrots are ready to harvest?
- Check the diameter of the carrot shoulder at the soil line. Most varieties are ready when the tops are about 1/2 to 1 inch in diameter. You can gently brush away some soil to check the size. Don’t wait too long, as overly mature carrots can become woody and less sweet.
- Can I grow carrots in containers?
- Absolutely! Containers are an excellent way to control the soil environment. Choose a container that is at least 12-15 inches deep to allow room for root development. Select shorter varieties like ‘Paris Market’ or ‘Danvers Half Long’ and use a high-quality, loose potting mix.
- Why do my homegrown carrots taste bitter?
- Bitterness can be caused by several factors. The most common is harvesting too early before sugars have fully developed. It can also be caused by stress from inconsistent watering or very hot weather. Finally, if the top “shoulder” of the carrot is exposed to sunlight, it can produce chlorophyll, turning it green and bitter.
- Is it really necessary to thin carrots?
- Yes, it is arguably the most important task after soil preparation. Without proper thinning, carrots will be severely overcrowded. They will compete for resources, resulting in a dense patch of lush green tops with a tangled mess of tiny, unusable roots underneath.